Easy Homeschool Organization: Farmette Kitchen Ideas
Homeschool organization for small spaces can feel like a constant battle, right? You know the drill: stacks of books teetering on the counter, math manipulatives spilling out of drawers, and that nagging feeling that your “classroom” is taking over your entire home. If your farmette kitchen doubles as your learning hub and you’re tired of the clutter creeping into every corner, I have some good news! Imagine a cozy, functional space where everything has its place, your lessons flow smoothly, and you can actually enjoy cooking a meal without tripping over textbooks. We’re talking about creating that serene, organized haven in just a weekend, for around $100-$200. In this article, I’ll walk you through simple, budget-friendly strategies to reclaim your kitchen and transform it into a delightful learning environment. Get ready to discover clever storage hacks, space-saving solutions, and easy DIYs that will make your small-space homeschool dream a reality.

Homeschool Organization for Small Spaces: Taming the Farmette Kitchen Chaos
As a fellow homeschool parent navigating the wonderful, messy world of learning from home, I understand the unique challenge of creating dedicated learning zones, especially when space is at a premium. My own home is a cozy, smaller-than-average farmette, and our kitchen often doubles as our primary classroom. Over time, I’ve discovered that with a little planning and some smart organization, even the busiest kitchen can become a functional and inspiring homeschool hub. Today, I want to share my tried-and-true methods for organizing your farmette kitchen for homeschool success.
The Farmette Kitchen: A Unique Challenge and Opportunity
The farmette kitchen, often characterized by its rustic charm, hardworking nature, and central role in family life, presents a special set of organizational hurdles for homeschooling. It’s where meals are prepared, snacks are dispensed, and often, where homework battles are waged. The key is to embrace its multi-functional nature and carve out distinct zones without sacrificing its heart-of-the-home feel. Think of it less as a dedicated classroom and more as an integrated learning environment.
What You’ll Need and Roughly What it Costs
Let’s talk about the essentials for transforming your farmette kitchen into a homeschool haven. The good news is that you can achieve amazing results without breaking the bank.
* **Vertical Storage Solutions:**
* **Wall-mounted shelves or floating shelves:** These are lifesavers in small kitchens. Look for simple wooden or metal shelves. For a 3-foot shelf, expect to pay between $20-$50. We have three shelves above our sink, totaling around $90.
* **Pegboards:** Fantastic for hanging utensils, craft supplies, and even small baskets. A 2-foot by 3-foot pegboard costs approximately $30-$50.
* **Over-the-door organizers:** For pantry doors or cabinet doors. These can hold cleaning supplies, extra notebooks, or even curriculum binders. Expect to spend $15-$30 per organizer.
* **Containerization is Key:**
* **Clear storage bins/baskets:** Essential for corralling smaller items like pencils, crayons, flashcards, or math manipulatives. A set of 6 medium-sized (12″x8″x6″) bins might cost $40-$70.
* **Magazine holders/file sorters:** Perfect for keeping notebooks, workbooks, and loose papers organized. A set of 4 can range from $20-$40.
* **Jars and canisters:** For art supplies like paintbrushes, markers, or even snacks. You can often find attractive sets for $30-$60.
* **Surface Solutions:**
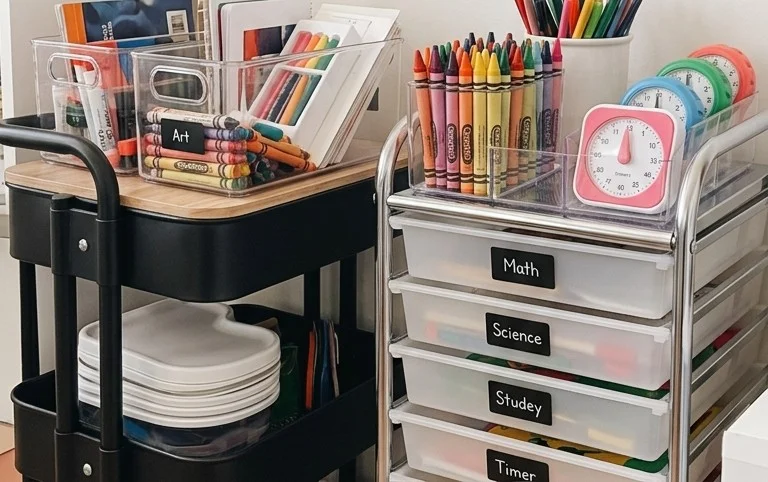
* **Rolling cart or island:** If you have a bit more floor space, a 2-3 tiered rolling cart can provide valuable extra workspace and storage. These can range from $50-$150.
* **Drawer organizers:** To keep cutlery drawers and utensil drawers from becoming a jumbled mess. A good set can be found for $20-$40.
* **Task-Specific Items:**
* **Small whiteboard or chalkboard:** For quick notes, math problems, or visual aids. A 2-foot by 1.5-foot whiteboard might cost $30-$50.
* **Clipboards:** For portable work surfaces. A pack of 5 can be around $15-$25.
**Estimated Initial Investment:** For a comprehensive overhaul, you might be looking at an initial investment of **$300-$600**. However, this can be spread out over time, and you can start with the most crucial items.
Measuring and Planning Before You Start
This is arguably the most important step to avoid wasted money and frustration.
1. **Assess Your Current Space:** Walk through your kitchen with a tape measure and a notebook.
2. **Identify “Problem Areas”:** Where does clutter tend to accumulate? Are there items you can’t find?
3. **Determine Your Homeschool Needs:** What subjects do you focus on in the kitchen? What supplies do you use most frequently? Think about:
* Math manipulatives
* Art supplies
* Reading materials
* Science experiment components
* Daily worksheets and assignments
4. **Draw a Rough Floor Plan:** Sketch out your kitchen layout, noting appliance placement, cabinet doors, and windows.
5. **Measure Available Vertical Space:** Measure the walls where you might hang shelves. Note the height between cabinets and countertops. Measure the inside dimensions of cabinets and drawers.
6. **Visualize Zones:** Where will your “learning corner” be? Where will supplies be stored? Where will you put your whiteboard?
**Example Measurements:** Let’s say you have a 4-foot section of wall above your counter that’s 18 inches high. This is a perfect spot for two 2-foot floating shelves, providing ample vertical storage for books and bins.
A Clear Numbered Walkthrough of the Process
Once you have a plan, it’s time to execute!
1. **Declutter Ruthlessly:** Before you bring in any new organizational tools, go through everything. Donate or discard items you no longer need or use. This applies to kitchen items as well as homeschool supplies.
2. **Install Vertical Storage:** If you’re drilling into walls, this is the time. Install your shelves, pegboards, or any other wall-mounted items according to manufacturer instructions. Ensure they are securely fastened. *For rentals, skip to step 3 and focus on freestanding options.*
3. **Implement Freestanding Solutions:** Bring in your rolling cart, place your magazine holders on shelves, and arrange your bins.
4. **Zone Your Supplies:** This is where your planning pays off.
* **”Math Zone”:** A designated bin or shelf for math manipulatives, workbooks, and calculators.
* **”Art/Craft Zone”:** Jars for markers and crayons, a basket for glue sticks, scissors, and construction paper.
* **”Reading Nook”:** A section of a shelf for current readers and assigned texts.
* **”Daily Workflow”:** A magazine holder or tray on the counter for today’s worksheets and assignments.
5. **Set Up Your Command Center:** Mount your whiteboard or chalkboard in a visible, accessible spot. Keep markers and an eraser nearby.
6. **Organize Drawers and Cabinets:** Use drawer dividers and smaller bins to compartmentalize these spaces. Group similar items together.
7. **Final Touches:** Add decorative elements that fit your farmette style.
Adapting for a Small Space or Rental
Living in a small farmette means maximizing every inch. And for renters, drilling is often out of the question.
* **Embrace Freestanding Everything:** Rolling carts, tension rod shelves in cabinets (great for creating extra layers of storage), over-the-sink drying racks that also offer shelf space, and freestanding tiered shelving units are your best friends.
* **Utilize Existing Furniture:** The top of your refrigerator can hold lightweight items in decorative baskets. The space beneath your kitchen table can be home to small, stackable bins.
* **Command Hooks are Gold:** For hanging lightweight items like clipboards, small baskets, or even a dish towel, strong command hooks can work wonders without damaging paint.
* **Think Mobile:** A rolling cart allows you to move your “learning station” around as needed. It can be tucked away in a corner or brought to the table when it’s time to work.
Styling Notes: Color, Texture, and Placement
Your farmette kitchen is likely a place you want to feel warm and inviting, not stark and sterile.
* **Color Palette:** Embrace natural, earthy tones. Think muted greens, creams, soft blues, and wood tones. These colors create a calming atmosphere conducive to learning.
* **Texture:** Incorporate natural textures like wood, woven baskets, and linen. This adds warmth and a touch of that farmette charm.
* **What to Put Where:**
* **High Shelves:** Store less frequently used items here, like seasonal craft supplies or extra curriculum.
* **Eye-Level Shelves:** Keep frequently accessed items here – current workbooks, reading material, and art supplies for ongoing projects.
* **Countertop:** Reserve for your “daily workflow” items – today’s assignments, a small plant, and perhaps a decorative jar for pens. Avoid cluttering the primary food prep areas.
* **Drawers:** Keep them dedicated to their purpose – cutlery, cooking utensils, or specific homeschool supply kits (e.g., a dedicated “math kit” bin for a specific grade).
* **Pegboard:** Hang frequently used kitchen utensils alongside classroom supplies like scissors, rulers, and maybe even a small whiteboard eraser.
The goal is for the homeschool elements to blend seamlessly into the kitchen’s existing aesthetic. Think of your storage bins as decorative baskets and your magazine holders as stylish file organizers.
Keeping it Tidy After Week One
The shine of new organization can wear off quickly if you don’t establish routines.
1. **The 5-Minute Tidy:** At the end of each learning session, or at the end of the day, dedicate 5 minutes to putting things back in their designated spots. This is crucial.
2. **End-of-Day Reset:** Before you turn off the kitchen lights, do a quick sweep. Clear the countertops, put stray papers in their holders, and return bins to their shelves.
3. **Weekly Review:** Once a week, perhaps on a Friday afternoon, spend 10-15 minutes doing a more thorough tidy. File completed work, restock supplies, and declutter any new piles that have formed.
4. **Involve the Kids:** Teach your children where things belong and empower them to be responsible for their own supplies. Make it a habit for them to tidy their workspace.
Mistakes That Make This Fail
Even with the best intentions, some organizational systems can fall apart.
* **Overbuying:** Don’t purchase organizational tools until you’ve done your planning and decluttering. You might find you need less than you think.
* **No Designated “Home”:** Every item needs a specific place to live. If something doesn’t have a home, it will end up on a counter or a chair.
* **Ignoring the “Workflow”:** If your system isn’t practical for your daily routine, it won’t stick. The “daily workflow” area is especially important for keeping immediate tasks manageable.
* **Not Involving the Family:** If the organization is only in your head, it won’t work. Everyone needs to understand the system and be on board.
* **Perfectionism:** Don’t aim for magazine-cover perfection. Aim for functionality and usability. A slightly messy but functional system is better than a perfectly tidy but unusable one.
* **Forgetting to Declutter Regularly:** Organization isn’t a one-time event. It’s an ongoing process of decluttering and reassessing.
By implementing these strategies, you can transform your farmette kitchen into a functional, organized, and inspiring space for homeschooling. Remember, it’s about creating a flow that works for your family and embracing the charm of your hardworking kitchen. Happy organizing!
Conclusion
Embracing homeschool organization for small spaces, even in your farmette kitchen, can truly transform your daily rhythm. Imagine less clutter, more calm, and precious moments instead of frantic searching. The difference it makes to your family’s learning and your own sanity is immeasurable.
Ready to start? Your smallest first step today could be as simple as decluttering one drawer. You’ll be surprised by the impact!
More Ideas for Your Home:
Living Room: Consider vertical shelving or a stylish ottoman with hidden storage.
Budget-Friendly: Repurposed jars and creative use of wall hooks can work wonders.
We invite you to explore more creative ideas to make your home a more functional and beautiful learning haven!