Easy DIY Backpack Storage: Cube Organizer Ideas
Easy DIY backpack storage and organization using a cube organizer is about to become your new best friend for tackling that school run messy bun chaos! Does the sight of backpacks, shoes, and stray school papers scattered across your entryway make you sigh? You know the feeling – you’re rushing out the door, and suddenly finding everything you need feels like a treasure hunt. Imagine, instead, a neat, designated spot where each backpack has its own cube, complete with pockets for water bottles, snacks, and even homework folders. No more last-minute scrambles! This simple solution can be put together in under an hour and costs surprisingly little, often utilizing items you might already have. In this article, I’ll show you exactly how to transform a basic cube organizer into a functional and stylish command center for your family’s gear.

Taming the School Run: Easy DIY Backpack Storage with a Cube Organizer
The school run. For many of us, it’s a daily dance of misplaced shoes, forgotten lunches, and, of course, the dreaded backpack avalanche. As soon as the kids arrive home, their backpacks – often stuffed to the brim – are unceremoniously dumped by the door, creating a tripping hazard and a visual clutter that can quickly spread through the entire house. Sound familiar? If your entryway or hallway resembles a backpack graveyard, then I have a simple, effective, and surprisingly stylish DIY solution for you: the humble cube organizer.
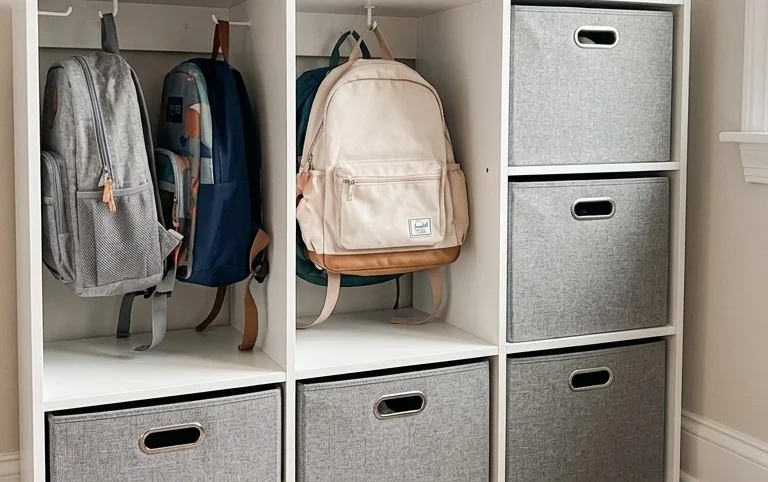
This project is designed to be incredibly easy, budget-friendly, and best of all, it will bring order to the chaos, making those morning departures so much smoother. We’re aiming for a space where everything has its place, from homework folders to water bottles, all neatly contained within a functional and aesthetically pleasing unit. Think of it as a dedicated backpack station that will transform your entryway from a disaster zone to a designated zone of calm.
What You’ll Need and Roughly What It Costs
The beauty of this project lies in its simplicity and affordability. The star of the show is a cube organizer. You can find these at most major home goods stores, online retailers, and even some department stores.
* **Cube Organizer Unit:** I recommend a 2×2 or 3×3 unit for most families. A 2×2 is a great starting point for younger children or families with fewer backpacks. A 3×3 offers more space for older kids or if you have a lot of gear.
* *Rough Cost:* $30 – $70, depending on the brand, size, and material (particleboard is cheaper than solid wood).
* **Fabric Storage Bins:** You’ll need one bin for each cube. Opt for bins that fit snugly but can still be easily removed. Look for bins with handles – they’re a lifesaver!
* *Quantity:* 4 for a 2×2 unit, 9 for a 3×3 unit.
* *Rough Cost:* $4 – $10 per bin. So, for a 2×2 unit, budget $16 – $40. For a 3×3 unit, $36 – $90.
* **Optional: Wall Anchors/Straps:** If you have very active kids or live in an earthquake-prone area, securing the unit to the wall is a smart safety measure.
* *Rough Cost:* $5 – $15.
* **Optional: Command Hooks or Small S-Hooks:** For hanging hats, scarves, or masks.
* *Rough Cost:* $5 – $10.
**Total Estimated Cost:** For a 2×2 unit, you’re looking at roughly $50 – $125. For a 3×3 unit, expect to spend $70 – $195. These are one-time purchases that will provide lasting organization.
Measure Twice, Buy Once: Planning Your Backpack Station
Before you rush out and buy the biggest cube organizer you can find, take a moment to measure your space.
* **Location, Location, Location:** Where will this organizer live? Ideally, it should be near your main exit door. Measure the available floor space. Don’t forget to account for door swings and high-traffic areas. You don’t want your new organizer to be a constant obstacle.
* **Backpack Dimensions:** Roughly measure your children’s backpacks. Consider their typical contents. A small preschooler’s backpack is very different from a high schooler’s, which might be bulging with textbooks. This will help you decide if you need wider or deeper bins.
* **Height Considerations:** Think about who will be using the organizer. For younger children, having lower shelves accessible is key. For older kids, you can position bins higher. A 2×2 unit is typically around 25 inches high, and a 3×3 unit is around 38 inches high.
For example, let’s say you have a 4-foot-wide section of wall by your front door. A 2×2 organizer, which is usually around 25 inches wide and 13 inches deep, will fit comfortably. A 3×3 unit, which is about 38 inches wide, might be too large for this space.
Your Step-by-Step Guide to Backpack Bliss
This is where the magic happens! It’s so simple, you might be surprised at how quickly you can get organized.
1. **Assemble the Cube Organizer:** Follow the manufacturer’s instructions carefully. This usually involves connecting side panels to a top and bottom panel, and then adding any middle dividers. Most cube organizers are designed for tool-free assembly, which is a huge plus.
2. **Place the Organizer:** Position the assembled unit in your chosen location. Ensure it’s stable and level.
3. **Secure (Optional but Recommended):** If you’re using wall anchors, now is the time to attach them according to their instructions. This is especially important in homes with children or pets, or if you’re concerned about the unit tipping.
4. **Insert the Fabric Bins:** Slide your fabric storage bins into each cube. Make sure they are seated properly.
5. **Add Hooks (Optional):** If you’re using hooks, attach them to the sides or top of the organizer, or to the wall above it, using the provided adhesive or screws.
Rental-Friendly & Small Space Solutions
Worried about drilling holes in your rental? Or perhaps you’re working with a tiny entryway? Don’t fret!
* **No-Drill Anchoring:** Many cube organizers come with anti-tip straps that can be secured to furniture or door frames using strong adhesive. Command Strips are also your best friend for hanging accessories like hooks.
* **Vertical Space is Your Friend:** If floor space is limited, opt for a taller, narrower cube organizer. A 1×4 or 2×4 configuration can provide ample storage without taking up too much width.
* **Under-Furniture Storage:** Can’t fit an organizer? Consider a low-profile organizer that can slide *under* a console table or bench. Just ensure there’s enough clearance.
* **Wall-Mounted Shelving (with permission):** In some rentals, you might be able to get permission to install a few sturdy shelves instead of a freestanding unit. Again, always check your lease agreement.
Styling Notes: Making it Look Good, Even When It’s Full
Organization doesn’t have to be drab! Here’s how to make your backpack station stylish:
* **Colour Cohesion:** Choose fabric bins in colors that complement your existing decor. Neutrals like grey, beige, or cream are always safe bets and can make the space feel more sophisticated. Alternatively, pick a bolder color to add a pop of personality.
* **Texture Play:** Mix and match textures for visual interest. Some bins might be smooth canvas, others woven straw, and some might have a faux leather trim. This adds depth and prevents the unit from looking too uniform.
* **Strategic Placement:**
* **Bottom Cubes:** These are perfect for the actual backpacks. Have each child claim a bottom cube. This encourages them to put their backpack *in* its designated spot.
* **Middle Cubes:** Use these for less frequently accessed items or shared gear. Think sports equipment, spare jackets, reusable water bottles, or lunch boxes.
* **Top Cubes:** Ideal for hats, scarves, gloves, sunglasses, or even mail that needs to be sorted.
* **Personalization:** Consider adding labels to the bins. You can use a label maker, stencils, or even just handwritten tags tied with twine. This is especially helpful for younger children learning to manage their belongings.
* **Decorative Touches:** A small plant, a framed photo, or a decorative tray on top of the organizer can elevate the look and make the entryway more welcoming.
Keeping the Tidy Train on the Tracks: Beyond Week One
The novelty of a new organization system can wear off. Here’s how to maintain your backpack bliss:
* **The “Empty and Sort” Ritual:** Make it a habit. Every evening before bed, or first thing in the morning, have everyone empty their backpacks. This means taking out homework, permission slips, and anything that doesn’t belong in the backpack overnight.
* **Designated “Home” for Everything:** Reinforce where things *live*. The water bottle goes in the middle cube, the hat goes in the top cube, the backpack goes in the bottom cube. Consistency is key.
* **Regular Purges:** Backpacks can become black holes of forgotten treasures and crumpled papers. Schedule a quick backpack clean-out session once a week or bi-weekly. Get the kids involved!
* **The “One In, One Out” Rule:** When a new item comes into a cube bin (like a new water bottle or a thicker scarf), try to encourage an old or unused item to leave.
* **Visual Cues:** Keep the bins tidy. If a bin is overflowing, it’s a sign that its contents need to be reassessed or redistributed.
The Mistakes That Make This Fail
Even the best intentions can go awry. Here are common pitfalls to avoid:
* **Overcrowding:** Trying to stuff too much into each cube. If a bin is constantly overflowing, you need to re-evaluate what’s being stored there or consider a larger organizer.
* **Lack of Buy-In:** If the kids don’t understand the system or aren’t on board, it will quickly fall apart. Involve them in the planning and explain *why* this organization is beneficial for everyone.
* **Unrealistic Expectations:** This system isn’t magic. It requires ongoing effort. Don’t expect perfection from day one. Be patient and consistent.
* **Forgetting the “Why”:** When things get messy again, remind yourself of the stress it caused before. The brief effort to maintain the system is far less painful than the daily chaos.
* **Ignoring the “Non-Backpack” Items:** This system is for backpacks and their immediate accessories. Don’t let it become a dumping ground for random mail, shoes that belong elsewhere, or toys. Keep it focused.
Implementing this DIY backpack storage solution with a cube organizer is a game-changer for busy families. It’s a small investment of time and money that pays dividends in reduced stress, a tidier home, and smoother school runs. You’ll wonder how you ever lived without it!
Conclusion
Implementing a simple DIY backpack storage and organization system with a cube organizer can truly transform your daily routine. Imagine calmer mornings and evenings, free from the frantic search for school supplies. That feeling of knowing exactly where everything is, even for the busiest “messy bun” mornings, is priceless.
Ready to reclaim your sanity? Your smallest first step today could be as simple as clearing out one cube. Think of it as your backpack’s new home! If a cube organizer isn’t quite right, consider repurposing a wall-mounted shelf for a more compact solution, or even a decorative basket for a budget-friendly entryway touch.
There are so many ways to bring order and style into your home. We hope this article has inspired you. Explore more of our home decor and organization ideas to discover your next project!